Latest Post
Showing posts with label Linux Tips. Show all posts

Quick Tips to Backup your Linux Computer

Written By Unknown on Saturday, 20 August 2011 | 09:34

Linux gives you plenty of control over your computer, but with great power comes great responsibility. That means backing up your files regularly (among other things), and while cloud storage is attractive, for many of us, it's not enough. Here's how to back up your data (note: I am using Ubuntu, so the details may differ somewhat if you use a different distribution):

Related tutorial: 16 Cool Ubuntu Tips for Linux Users

1. From the search bar, just type "backup" to bring up preinstalled options. I'll be using Simple Backup Suite.

2. From the first tab (General), tell Linux how often you want to perform a complete back up and what format, if any, to use for compression.


Step 2: General tab.

3. Select the Include tab to add files and directories. The default is pretty good for most users, but you may have some files hidden away that deserve to be backed up, so be thorough! You only have to do this once.

4. Select the Exclude tab if you want to keep some files or subfolders from being archived. There's no special reason to do this unless you're trying to save space (or you're a bit compulsive).

5. Make sure to select the Destination tab to pick your storage location. As with any other backup, you'll want it to be as secure as possible. A network location is probably best, though your needs may vary.


Step 5: Destination tab.

6. The Schedule tab lets you set a schedule to do incremental backups of files that have changed since the last backup. This happens in the background and shouldn't interrupt your day-to-day work.

7. Click the disk icon at the top to save your settings, then click the drive icon to back up your files. The first one will take a while, most likely, as will future complete backups, so you may want to schedule them for downtimes.

That's it. Once you've worked through this, the only reason you'd need to revisit the tool is to change the frequency, location, or contents of your backups. Do it as soon as you can--even Linux can't protect you from disk failure!

Ubuntu: How to Install and Run Linux from your USB Flash

Written By Unknown on Wednesday, 6 July 2011 | 11:55

What do you use your USB flash drive for? Have you considered running Linux from it? A Linux Live USB flash drive is a great way to try out Linux without making any changes to your computer. It's also handy to have around in case Windows won't boot--allowing access to your hard disks--or if you just want to run a system memory test.

Install Ubuntu onto USB flash drive

There are a lot of Linux distros to choose from, but in our example, we are going to install Ubuntu using a Windows machine. Your USB flash drive should be at least 1GB in size.

Step 1: Download the 32-bit ISO of Ubuntu 11.04 Desktop and the Universal USB Installer. The ISO file is named ubuntu-11.04-desktop-i386.iso and the Universal USB installer is named Universal-USB-Installer-1.8.5.6.exe.

Step 2: Double-click on Universal-USB-Installer-1.8.5.6.exe and after accepting the license agreement, select Ubuntu 11.04 from the drop-down list.

Ubuntu-onto-USB-flash-drive

Step 3: Browse and select the Ubuntu 11.04 ISO file you just downloaded.

Ubuntu-onto-USB-flash-drive

Step 4: Select the drive letter of the USB flash drive you want to put Ubuntu onto and check the box to format the USB flash drive. Make sure persistent file size is set to 0MB, then click the Create button.

Ubuntu-onto-USB-flash-drive

Step 5: Confirm the details of the install then click the Yes button.

Ubuntu-onto-USB-flash-drive

Run Ubuntu Live

Step 1: Make sure that your computer's BIOS is set to boot from USB devices then insert the USB flash drive into a USB 2.0 port. Turn your computer on and watch it boot to the installer boot menu.

Step 2: At the installer boot menu, select "Run Ubuntu from this USB."

Step 3: You'll see Ubuntu start up and eventually get the Ubuntu desktop. From here, you can configure your Wi-Fi and use the included Firefox browser to access the Internet.

Ubuntu-onto-USB-flash-drive

There you have it. Now you know how to set up your USB flash drive to run Linux. Keep in mind that any changes you make while running Linux Live will not be saved. If you like what you see and want to run the full-blown version of Ubuntu, you can use the USB flash drive to install it onto your computer. Good luck and have fun!

Changing Ubuntu Usplash Screen Easily

Written By Unknown on Tuesday, 15 February 2011 | 07:53

I remember when I first booted up Ubuntu on my computer five years ago that I wasn’t very impressed with the dull black usplash screen. It gave me a feeling that I was back to the Windows 95 era.

five years down the road, even though the Ubuntu team has made changes and improvements to the usplash screen, it is still nowhere close to beautiful. Luckily, a good thing about Linux (and Ubuntu) is that it is fully customizable and you can tweak every single part to your liking. That is to say, even though the default does not come with a beautiful usplash screen, you can still change ubuntu usplash screen to display your favorite image.

Follow the guide below and you’ll be able to change Ubuntu splash screen in no time.

In Ubuntu Intrepid, there is a bug that prevents you from setting your own usplash screen. To overcome this, we will remove the default usplash and install splashy.

Removing the usplash

Open up a terminal (Applications -> Accessories -> Terminal) and type the following command to remove the default usplash.

sudo apt-get autoremove usplash

Installing splashy

Download the deb files for your machine:

32-bit: libsplashy1_0.3.10-1_i386.deb, splashy_0.3.10-1_i386.deb

64-bit: libsplashy1-dev_0.3.13-3ubuntu1_amd64.deb, libsplashy1_0.3.13-3ubuntu1_amd64.deb, splashy_0.3.13-3ubuntu1_amd64.deb

Double click the packages to install splashy in your machine.

Back to the terminal,

sudo apt-get install splashy-themes

Download your favorite splashy theme

There are several places where you can find and download beautiful splashy themes. Here are some of them for your references.
Once you have found your favorite theme, download it to your desktop. The file should be in tar.gz format.

(If you are looking to create your own splash themes, here is the full tutorial)

To install the file, type the following command in the terminal.

sudo splashy_config –i /path-to-the-file.tar.gz
sudo splashy_config -s name-of-the-file
sudo update-initramfs -u


To illustrate, assuming that I have downloaded a theme with the name custom-usplash.tar.gz onto my desktop. In my terminal, this is what I type:

sudo splashy_config -i ~/Desktop/custom-usplash.tar.gz
sudo splashy_config -s custom-usplash
sudo update-initramfs -u


It is important to type the command manually. Do not copy from here. WordPress displays the ‘-’ sign differently from the terminal. You might get errors if you copy/paste the command directly from here.

Configuring the kernel entry

In your terminal, type the following command to open the grub menu file

gksu gedit /boot/grub/menu.lst

Scroll down till you find the line

kernel /boot/vmlinuz-2.6.27-7-generic root=UUID=82ace599-c240-456a-8df9-96b0b477d00b

ro  single

Append the phrase ‘vga=791′ (without the quote) to the end of the line (refer to the image below). Save and close the file.


That’s it. Restart your computer. You should see your favorite usplash in action.

Here are some of the splashy theme screenshots (taken from gnome-look):

Aqua for splashy


Simple bluish for splashy


 Ubuntu Glass


Uninstallation

To uninstall splashy and to return the usplash screen to the original setting, type the following in the terminal.


sudo apt-get autoremove splashy splashy-themes
sudo apt-get install usplash

Your usplash screen should now return to the default setting.

8 Handy / Useful Plugins For Gnome-Do

Gnome-Do is a quicksilver-like application for Linux. By itself, it is only a simple application launcher, and seriously speaking, I find that there is nothing great about it on its own. However, if you make good use of the plugins in the repository, you will discover that there are tons of things  that you can do with it. Some of them are really a great time-saver and are able to make your life easier.

So here it is, my recommendation of the 8 most useful plugins for Gnome-Do:

1. Locate files


I am definitely not the type who likes to dig several levels down the filesystem to locate a particular file. That is where the ‘Locate file‘ plugin is useful. Load up Gnome-Do (by pressing “Win + Space” key), type the first few characters of the filename and it will fetch the required files for you, no matter how secluded it is.

2. Twitter


Send your tweets from the Gnome-Do without having to open your Twitter client. A good and quick way to update your twitter without having too much distraction.

3. Rhythmbox


If you are like me, who enjoys playing music in the background while working, then this plugin is particularly useful. You can control your Rhythmbox to start playing your favorite track, pause, mute, unmute, volume up/down, change to next/previous track or to display current track info, all within the small Gnome-Do box.

4. Gnome Terminal


Gnome Terminal is useful because it eliminates the need for you to launch the Terminal. Being someone who love the command line interface more than the GUI, I simply love this plugin that allows me to type and run in the command line from Gnome-Do. (I used to have a Terminal shortcut icon on my dock so that I can launch the Terminal quickly. Ever since, I installed this plugin, I have removed the shortcut icon from my dock as I have no longer any use of it)

5. Apturl


Rather than typing ‘sudo apt-get install package-name’ everytime you wanted to install a package, now you just need to type the package name and Gnome-do will do the installation for you. The only caveat: this works only if you know the full name of the package and spell it correctly.

6. Opensearch


Opensearch allows you to search from your desktop using a variety of search engines. From Google, Yahoo, eBay, CreativeCommon, Answer.com, Amazon.com to Wikipedia, depending on what you want to find, you can easily get the information you want from Gnome-Do. I particularly like to use CreativeCommon to find photos for my blog.

7. Flickr


Quickly upload your photos to Flickr without accessing your Flickr account in the browser. You can choose to upload one photo or a bunch of photos from a particular folder. It works quietly in the background and does not provide any distraction.

8) Tomboy Notes


Do you feel disoriented without your Tomboy notes? Well, I do. I use Tomboy notes to keep reference to articles that I have read online. That’s why I find this plugin particularly useful. It provides you with a quick and neat way to create a new note or to dig up material from your existing Tomboy notes. It is very handy when you have all the information at your fingertips.

(To install plugins, load up Gnome-Do by pressing ‘Win + Space’ keys. Click on the arrow at the top right hand corner and select ‘Preferences’. Go to the ‘Plugins’ tab and check the plugins you want.)

What are your favorite Gnome-Do plugins?

Becoming more dymanic with Launchy Keystroke Launcher

Launchy, previously mentioned as a Windows start menu alternative, is a powerful keystroke based launcher for your Windows computer. Using Launchy, you can start programs, view files and folders, access bookmarks and perform other such tasks.

In this post, I’ll talk about how you can use Launchy to stay more productive throughout the day. Trust me, once you get the hang of it, you’ll never touch icons or your start menu again. It just rocks. Before you go about using it, let’s have a look at some basic configuration options that you can alter to make Launchy work better for you.

Installation and Basic Configuration


Just grab the installer from the Sourceforge page, install Launchy and if the installation went smoothly – chances are you won’t see anything new. No system tray icon. No visible windows. Yup, nothing really. Until you press the ALT + SPACE keys together.


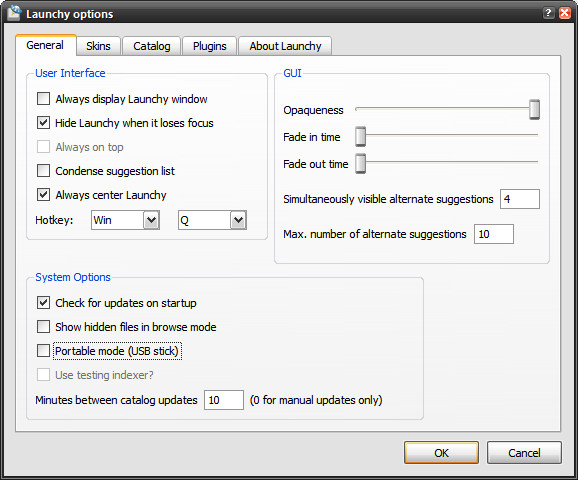
You can now right click on the Launchy box and configure Launchy’s behaviour by going to Options. Keep the first option checked if you want Launchy to be shown all the time. I wouldn’t recommend it though, since it’d interrupt your use of other applications/windows. You can, of course, modify the shortcut key to anything you wish – just modify the Hotkey option.

You can also set the transparency levels from the GUI Options. Launchy also provides alternate suggestions if you typed an unknown program name, you can set how many such items should be displayed.

From the Skins tab, you can choose from a number of skins for Launchy to make it blend with your desktop. User-created skins are available on DeviantArt.com and also from the Sourceforge forum.

Configure Indexing

Launchy needs to index your programs before you can actually use it. By default, Launchy indexes your Start Menu folder since most programs are present there. However, if you want to be able to launch your programs or files, you need to tell Launchy where they’re present.


To do this, use the Catalog tab and use the + button to add your commonly used directories to the Launchy index. You also need to specify what files need to be indexed – you might want your music files indexed, but not your .dll files. You can specify using the File Types box.

By checking the Executables option, you’re telling it to index all .exe files (these are generally software programs installed on your computer).

When you’re done with that, just click Rescan Catalog and now Launchy should have got all your program and files info into your index. Pretty quick too!

Using Launchy


Let’s take off with Launchy. First, just press the default hotkey combination. If you’ve modified the hotkey using the settings, press the ones that you’ve opted for. The launch window should popup.

launchy_scrnJust type in a few letters of the app’s name and Launchy should instantly show its icon in the dock. Have a look at the screenshot on the right. I typed fox and it suggested Firefox. I launched it by pressing Enter

launchy_scrn2

In case you typed something and some other program instead of the program you intended to start shows up, just use the “down arrow” key for more programs that match your keyword. For instance, I typed Windows and it showed multiple suggestions.

Launchy can also be used as a simple calculator and it can peform basic arithmetic operations.

Portable Launchy

If you’ve got a USB drive and it’s loaded with portable apps, then the portable version of Launchy is something you shouldn’t miss to check out. Just activate the Portable Mode option from the Options dialog (please see the first screenshot in this post).

Then, copy the Launchy folder from C:\Program Files and put it on your USB Drive. Launchy will now store its configuration files in your thumb drive and will act as a portable launcher.

Plugins

Launchy supports plugins, and a few basic plugins are already present and can be activated. For instance, the Weby plugin indexes your Firefox and IE bookmarks so that you can open them quickly from Launchy.


You might find some more useful plugins for Launchy here.

16 Cool Ubuntu Tips For Linux Users

Yesterday, I wrote about books that beginners can download and read to teach themselves Linux. Today in the Linux section we have something for the power users. Here are a few tips you should try out if you are an avid Ubuntu Linux user:


1. Get lightning fast and clever at the command line

You can use keyboard shortcuts and other command line tricks to make entering commands easier and faster. You might already know about the ‘tab’ key which completes partial commands and even file and directory names.

Here are some other keyboard shortcuts you can use within terminal:

Ctrl-aMove to the start of the line.
Ctrl-eMove to the end of the line.
Alt-] xMoves the cursor forward to the next occurrence of x.
Alt-Ctrl-] xMoves the cursor backwards to the previous occurrence of x.
Ctrl-uDelete from the cursor to the beginning of the line.
Ctrl-kDelete from the cursor to the end of the line.
Ctrl-wDelete from the cursor to the start of the word.
Ctrl-yPastes text from the clipboard.
Ctrl-lClear the screen leaving the current line at the top of the screen.
Ctrl-x Ctrl-uUndo the last changes. Ctrl-_
Alt-rUndo all changes to the line.
Alt-Ctrl-eExpand command line.
Ctrl-rIncremental reverse search of history.
Alt-pNon-incremental reverse search of history.
!!Execute last command in history
!abcExecute last command in history beginning with abc
!nExecute nth command in history
^abc^xyzReplace first occurrence of abc with xyz in last command and execute it

2. Launch Ubuntu Linux Applications with keyboard

There are two ways you can achieve this:

  • Use applications like Launchy or Gnome-Do that make it easier to launch applications by typing a few characters of the application’s name.
  •  Or you can summon gconf editor (Alt+F2 then type gconf-editor and hit enter), and navigate to apps > metacity > global_keybindings, double click on any of the run_command_N and type in the keyboard shortcut you want to assign to an application then make a mental note of the number N. Then go to apps > metacity > keybinding_commands and double click on command_N (N being the number you used above) and type in the command you want to run. As an example if you wanted to run Firefox you would type in firefox.


3. Start from wherever you left off


You can make Ubuntu remember the applications you had open when you last logged out, so that when you log back in again you’ll find all those applications running and you can resume right from where you left off.

To achieve this go to System > Preferences > Startup Applications, then go to the options tab and check "Automatically remember running applications when logging out"

4. Create a Separate Ubuntu Linux Home Partition


New versions of Ubuntu arrive every 6 months. Although you can upgrade to the latest version via the update manager, sometimes the upgrade doesn’t work as expected so some users like to do a fresh clean install.

The disadvantage with that of course is that you lose data you had in your home directory. To overcome this you can create a separate Home partition when you are installing Ubuntu, size it according to your requirements and then when you decide to install Ubuntu the next time, simply specify this partition as the Home partition (by choosing /home as the mount point).

All your files and data on the Home partition will be preserved even after a fresh install.

5. Update and Install Ubuntu Linux Software Without Internet Connection

There are lots of way to do this, the easiest of all is to use APTonCD. APTonCD allows you to create CDs and DVD’s containing all the packages you want, which you can then use to install software on computers without an internet connection.

Note that APTonCD requires you to have an internet connection (or downloaded packages) to create the installed media. However once the media is ready you don’t need an internet connection for any of the machines you want to install the software on. Insert the appropriate CD/DVD and use apt-get as you would normally.

6. Install new fonts, Microsoft fonts and improve font rendering

Ubuntu doesn’t offer many choices when it comes to the fonts. However you can easily install new fonts including those from Microsoft like Arial, Verdana, impact and many more. You can use different sites to find the kind of font you are looking for.
7. Use PPAs, Install latest versions of software

There are a lot of steps that a software has to go through before it becomes part of Ubuntu or becomes available through the Ubuntu repositories. While all those steps lend additional stability, it generally means that you don’t get the latest versions of all the software as soon as they are released.

If you like to stay on the cutting edge, you can search for Personal Package Archives for your favorite software on Launchpad and add those to your installation’s software sources. I briefly touched on PPAs and how to use them here. If that seems like too much work, you can also download the latest deb packages and install them by double clicking (you won’t get automatic updates for the software if you install it this way).

Remember you might get into an occasional trouble or two with the latest versions, but mostly it wouldn’t be catastrophic. You can always hop over to the Ubuntu Forums to get quick help.

8. Be the root

The root account is disabled by default on Ubuntu installations, mainly to prevent you from doing something you didn’t intend to do. However if you "promise to be careful" you can enable root account as follows:


1. Type sudo passwd root and provide a root password.
2. Then head on over to System > Administration > Login Window, go to the Security tab and check "Enable local system administrator login"

You should now be able to login as root from the Login prompt. As an alternative you can use "sudo su" to provide your password and get root prompt.

9. Run Windows applications and games


Who wouldn’t like to play Counter Strike on Ubuntu (unless of course you are completely not into it) or perhaps even run Photoshop?

10. Shorten boot time with profiling

Ubuntu Linux devs have done a great job with the boot time, Jaunty is fast and Karmic is slotted to be even faster. There is however a bit more you can do by profiling your boot. Profiling lets Ubuntu make a list of all the files that are accessed during bootup, it then sorts the files according to how they are stored on your hard disk. So the next time the system is booted, the files would be read faster.

To profile boot you need to follow these steps

    * At the grub menu highlight the kernel you boot most often.
    * Press e for edit.
    * Choose the line starting with kernel and press e again. Now add the word profile to the end of this line. Hit Enter and then press b to boot

Note that while profiling, the system will boot slower this one time, the next time however you should see an improvement. Also keep in mind that all this is machine-dependent and also depends on the arrangement of files on your hard disk, so the difference you see might not be huge, or even nil in some cases.

11. Try out different Ubuntu Linux Desktop Environments and Desktop Managers

If you are looking for something different than the default Gnome interface, you should check out alternative desktop managers that you can use. If it is a complete Desktop Environment you are looking for, KDE4 has come a long way and is now impressively usable and fun. You can do a "sudo apt-get install kubuntu-desktop" to get KDE.

12. Create a media center or a media server


It would be great if you could easily browse and manage your huge collection of music, videos and pictures. Mesmerized by Windows Media Center’s slick interface? Wait till you see what all cool options you have to turn your Ubuntu system into a media center. You can even access your media collection on your phone, PSP or a different computer if you set up a media server on your Ubuntu machine.

13. Share Firefox profile data with Windows

Many people use Windows and Linux on the same machine. If you are one of them, there would have been times you couldn’t find that bookmark you created or password you stored when you were using Firefox from within Windows. For different computers you can of course use Weave.

14. Customize Nautilus to your liking


Nautilus is the default file manager on Ubuntu. While you may be content with what it does, there is lots more you can make it do. You can use extensions to improve functionality and even add custom functionality to Nautilus

15. Compile your own Kernel

If you can’t find something to keep you busy for the weekend and you have your customization hat on, how about building a kernel to specifically meet your requirements? This is frankly more of a learning experience. Some might say that it enables you to use just the features and drivers you require, but if everything is working fine with the kernel supplied and you don’t have any interest in the Linux kernel, skip ahead this one is not for you.

If however you require some of the experimental features of the kernel, or need it to be compiled in some other special way we say you check out this guide within Ubuntu Documentation.

16. Change Usplash Screen and create a custom splash screen for GRUB

So you didn’t count the last one? Here is another one then. A Usplash screen is Ubuntu text and a logo with a progress bar that you see when you boot up Ubuntu.

If you would like to change that to something more interesting follow these steps. What better way to show your Linux fu than customizing the very first screen that appears? You can create a custom splash screen using one of your photos, GIMP and a little tweaking. Here is the how-to.

Know some more tips or great hacks for Ubuntu Linux users? Sure you do, go ahead let us know about them in the comments.

4 Powerful Downloadable eBooks To Teach Yourself Linux ~FREE~

Written By Unknown on Monday, 14 February 2011 | 08:48

Am sure you've heard of all the advantages and geeky babble about how Linux is better and you have finally decided to try it? Just one thing, you don’t know an awful lot about Linux to get you started. How about some free downloadable ebooks to teach yourself Linux, that you can download today? Would that help?

Free – you ask? Yes, free. Welcome to the world of Linux where things are free both as in free speech and also as in free beer (mostly)!

If you are starting out on your journey towards Linux awesomeness, here are a few free downloadable ebooks to teach yourself Linux that should help you along nicely:


Introduction to Linux – A Hands on Guide

(Download)

Takes you from the absolute basics to basics. This hands on guide tells you everything right from logging in, basic file management, backup techniques up to basics of networking. It is what you need if you are having difficulty figuring out how to get to that resume file you saved just now. The guide explains Linux file structure and introduces to basic commands and text editors as well.


GNU/Linux Command line tools Summary

(Download)

One important aspect of working in Linux is that you have to familiar with the command line. This book shows you how to use the command line in Linux to your advantage. Apart from the ins and outs of the shell, this book also introduces various commands and the situations where you would use them. There are chapters that deal with specific tasks and list various commands you can use to achieve the task. If you can study online, there is another excellent manual you can refer to.


Ubuntu Pocket Guide and Reference

(Download)

Ubuntu is one of the most popular distributions, new users look up to when trying out Linux. If it is Ubuntu specific information that you are after then you should definitely check out Ubuntu Pocket Guide and Reference. The guide takes you from installing and configuring Ubuntu to adding and managing software and securing your system. A must read book if you use Ubuntu.


Rute User’s Tutorial and Exposition

(Download)

This one is not for the faint hearted! There is enough Linux juice in this book to keep even the intermediate to advanced users interested. The book begins humbly by presenting the basic commands and tools, however before you know it, you are learning everything from regular expressions to shell scripting to C programming to networking.

There is plenty of great material out there if you are trying to learn Linux, similar to these downloadable ebooks to teach yourself everything you ever wanted to know about Linux. If you have read a book or a tutorial that you found particularly useful, feel free to tell us about it in the comments below.

Shell Command Library - Linux Unix

Written By Unknown on Friday, 10 December 2010 | 04:55

Definition of Shell Command. (Shell Command Glossary

  • Built-in shell commands are part of a shell.
  • Each shell (e.g., C Shell, Bourne Shell and Korn Shell) has a set of commands built into its program.
  • Shell commands vary from one shell to another, but the commands within each shell stay the same across Linux / Unix distributions and variants.
  • To find out the usage of a shell command in the currently active shell on your computer, you can use the man command.
Also Known As: Built-in Shell Command

Important Note: Shell commands may vary in syntax and usage from one type of shell to another. The shell command library here is provided as general references. Use the man command to see how a command is used in a particular shell.

C Shell Commands and What They Do

The C shell provides the following built-in commands:

# Marks a command.
alias Displays alias.
bg Resumes job in the background.
break Resumes execution after the loop.
breaksw Breaks from a switch command; resumes after the endsw command.
case Defines a label in a switch command.
cd Changes directory.
chdir Changes directory, same as cd.
continue Continues a loop.
default Specifies the default case in a switch.
dirs Displays the directory stack.
echo Writes arguments to the standard output of the shell.
eval Evaluates a command.
exec Executes the command in the current shell.
exit Exits the shell.
fg Brings a job in the foreground.
foreach Specifies a looping control statement and execute a sequence of commands until reaching an end command.
glob Writes arguments to the standard output of the shell, like the echo command, but without the new line.
goto Continues execution after the specified label.
hashstat Displays hash table statistics.
history Displays the history list.
if Executes a command if condition met.
jobs Lists active jobs.
 kill Sends a signal to a process. term (terminate) is the default signal.
limit Sets or list system resource limits.
login Logs on.
logout Logs out.
nice Changes the priority of commands run in the shell.
nohup Ignores the hangup signal.
notify Notifies the user about changes in job status.
onintr Tells the shell what to do on interrupt.
popd Pops the top directory off the directory stack and changes to the new top directory.
pushd Exchanges the top two elements of the directory stack.
rehash Re-computes the hash table of the contents of the directories in the path shell variable.
repeat Repeats the execution of a command.
set Displays or set the value of a shell variable.
setenv Sets environment variables.
shift Shifts shell arguments.
source Reads commands from a script.
stop Stops a background job.
suspend Stops the current shell.
switch Starts a switch.
time Displays the time used to execute commands.
umask Shows or set file permissions.
unalias Removes command alias.
unhash Disables the internal hash table.
unlimit Removes limitations on system Resource.
unset Deletes shell variables.
unsetenv Deletes environment variables.
wait Waits for background jobs to complete.
while …end Executes the commands between the while and matching end statements repeatedly.
@ Displays or set the values of all the shell variables.
 
Support : Creating Website | Johny Template | Mas Template
Copyright © 2011. Turorial Grapich Design and Blog Design - All Rights Reserved
Template Created by Creating Website Published by Mas Template
Proudly powered by Blogger