Latest Post

4 Powerful Downloadable eBooks To Teach Yourself Linux ~FREE~

Written By Unknown on Monday, 14 February 2011 | 08:48

Am sure you've heard of all the advantages and geeky babble about how Linux is better and you have finally decided to try it? Just one thing, you don’t know an awful lot about Linux to get you started. How about some free downloadable ebooks to teach yourself Linux, that you can download today? Would that help?

Free – you ask? Yes, free. Welcome to the world of Linux where things are free both as in free speech and also as in free beer (mostly)!

If you are starting out on your journey towards Linux awesomeness, here are a few free downloadable ebooks to teach yourself Linux that should help you along nicely:


Introduction to Linux – A Hands on Guide

(Download)

Takes you from the absolute basics to basics. This hands on guide tells you everything right from logging in, basic file management, backup techniques up to basics of networking. It is what you need if you are having difficulty figuring out how to get to that resume file you saved just now. The guide explains Linux file structure and introduces to basic commands and text editors as well.


GNU/Linux Command line tools Summary

(Download)

One important aspect of working in Linux is that you have to familiar with the command line. This book shows you how to use the command line in Linux to your advantage. Apart from the ins and outs of the shell, this book also introduces various commands and the situations where you would use them. There are chapters that deal with specific tasks and list various commands you can use to achieve the task. If you can study online, there is another excellent manual you can refer to.


Ubuntu Pocket Guide and Reference

(Download)

Ubuntu is one of the most popular distributions, new users look up to when trying out Linux. If it is Ubuntu specific information that you are after then you should definitely check out Ubuntu Pocket Guide and Reference. The guide takes you from installing and configuring Ubuntu to adding and managing software and securing your system. A must read book if you use Ubuntu.


Rute User’s Tutorial and Exposition

(Download)

This one is not for the faint hearted! There is enough Linux juice in this book to keep even the intermediate to advanced users interested. The book begins humbly by presenting the basic commands and tools, however before you know it, you are learning everything from regular expressions to shell scripting to C programming to networking.

There is plenty of great material out there if you are trying to learn Linux, similar to these downloadable ebooks to teach yourself everything you ever wanted to know about Linux. If you have read a book or a tutorial that you found particularly useful, feel free to tell us about it in the comments below.

How To Enable IPv6 On Windows XP

Written By Unknown on Sunday, 6 February 2011 | 11:17

Most ISPs are in the process of enabling the IPv6 protocol which is then available for usage in addition to the currently used IPv4 protocol. Windows Vista and Windows 7 users do not need to enable or configure their operating system for IPv6 usage as it is enabled by default. The situation is different for Windows XP users who need to install the IPv6 protocol to add support for it to the operating system.

It is probably a good idea to test if IPv6 is already available on the operating system. An easy option to find out is the ipconfig command which displays network information in a command line window. To run the command press Windows-R, type cmd and hit enter. This opens the Windows command prompt. Now use the command ipconfig to find out if IPv6 is available on the computer. Please note that the following screenshot is showing ipconfig on Windows 7.


If you do not see an entry IPv6 Address in the listing it is not enabled and needs to be installed. The easiest way to install the IPv6 protocol under Windows XP is from the command prompt. Enter the following commands separately and press return after each of them:
  • netsh
  • interface
  • ipv6
  • install
This installs IPv6 under Windows XP. It is also possible to install the protocol under the network settings options of the Control Panel. Right-click on the appropriate network adapter and select Preferences from the selection. Now select Install on the screen and then Protocol from the available options. Locate Microsoft TCP/IP Version 6, a click on OK installs the selected protocol.

  1. Open Network Connections
  2. Right-click any local area connection, and then click Properties.
  3. Click Install.
  4. In the Select Network Component Type dialog box, click Protocol, and then click Add.
  5. In the Select Network Protocol dialog box, click Microsoft TCP/IP version 6, and then click OK.
  6. Click Close to save changes to your network connection.
You can check again with the ipconfig command to make sure that the IPv6 protocol was installed successfully on the operating system.

Three's Not A Charm.

Written By Unknown on Sunday, 30 January 2011 | 11:30

I noted a tweet in which the author complained that he'd be on hold with a customer service phone-line for so long that he'd realised that the music being played to him was a loop of three tunes and he'd hung up.

Now, obviously, he'd been kept holding for far too long. But it's also true that the company in question had idiotically ensured that he realised this by limiting the music to a cycle of three. The first priority is to deal with the customer swiftly, the second is to ensure they don't feel taken for granted.

In this case, the company got it wrong on both counts. If I were him, I'd ring up and complain. Or maybe not.

Symbols on Facebook

Written By Unknown on Saturday, 29 January 2011 | 08:52

Facebook symbols are Unicode-encoded special text characters. Many people wonder how their friends inserted these small cute hearts, smiley, symbols and musical notes into their facebook status updates, messages or comments. You can also insert these symbols for facebook into your status or messages. Follow these step by step instructions and you will also be able to decorate your facebook status with cute smileys, emoticons or symbols or you can generate your own designs with use of symbols.

How to insert Facebook Symbols into facebook

There are two ways you can use these symbols and decorate your facebook profile.

1. Just copy and paste facebook symbol codes from the list below into your name, status or messages. You can insert them into facebook chat as well.

2. Or you can use your computers ‘right side number pad ‘ and ‘alt’ keys to type these symbols.


Desktop computer instructions for Facebook ALT symbols:

  • Press and hold left Alt key on your keyboard.
  • While holding Alt key enter one of the codes below to get the corresponding facebook symbol.
  • Important note: You need to use numbers on the right side of the keyboard for entering code, not the numbers on top, otherwise they won’t work.
Laptop instructions for ALT symbols:

  • Press and hold left Alt key on your keyboard.
  • While holding Alt key also press and hold Fn key.
  • While holding Alt and Fn key enter one of the codes below to get corresponding facebook symbol.
  • Important note: You need to use numbers that are usually written next to letters U, I, O… and in different color, not the numbers on top, otherwise they won’t work.
ALT Symbols List

These symbols are called ‘alt symbols’ as they can be produced by using ‘alt key’ on your keyboard. Here is a list of alt symbols code with corresponding number. You can create these alt symbols on facebook, myspace or in emails.

Alt Symbols for Facebook

ALT code Symbols Description
Alt + 1 Happy smiley symbol
Alt + 2 Sad smiley or black smiley symbol
Alt + 3 Heart symbol/ facebook heart symbol
Alt + 4 Diamond symbol/ Facebook diamond symbol
Alt + 5 Club symbol
Alt + 6 Spade symbol
Alt + 7 Bullet 1 symbol
Alt + 8 Bullet 2 symbol
Alt + 9 Bullet 3 symbol
Alt + 10 Bullet 4 symbol
Alt + 11 Men sign or Men symbol
Alt + 12 Women sign or Women symbol
Alt + 13 Quaver
Alt + 14 Joined Quaver
Alt + 15 Funky sun or star symbol
Alt + 16 Play forward
Alt + 17 Play rewind
Alt + 18 Up and down arrow
Alt + 19 Double exclamation
Alt + 20 Carriage return symbol
Alt + 21 § Paragraph
Alt + 22 Dash
Alt + 23 Up and down arrow
Alt + 24 Up arrow
Alt + 25 Down arrow
Alt + 26 Right arrow sign
Alt + 27 Left arrow sign
Alt + 28 Tab marker
Alt + 29 Right and left arrow
Alt + 30 Bullet
Alt + 31 Bullet


Making Things Better.

Written By Unknown on Wednesday, 26 January 2011 | 03:40

Making good stuff from scratch is really difficult.

Removing bad stuff is relatively simple.

The former is to be encouraged, the latter is compulsory.

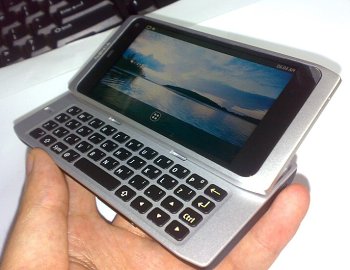
Nokia N9 to come at the MWC with a 1.2 GHz CPU, 12 MP camera?

Written By Unknown on Sunday, 23 January 2011 | 20:16

With the MWC fast approaching, rumors about the MeeGo-running Nokia N9 are starting to intensify again. If the Finnish source is to be trusted one of the most hotly anticipated smartphones of this year will make its debut at the congress in less than a month.
There will also be some serious hardware under the hood. Apparently the Nokia N9 will be the first Nokia smartphone to pack a 1.2 GHz CPU. The machine-translated source mentions something about it being an Intel Atom, but we can't imagine a way of stuffing the good old x86 Atom in a smarphone. Instead our guess is the N9 is based on the Intel Moorestown platform, which is essentially a smartphone SoC (system-on-a-chip) with an Intel Atom core as its heart.
Next, the Nokia N9 is supposed to have the same 12 megapiexel camera as the N8. Considering the qualities of the large-sensor unit inside the Nokia Symbian^3 flagship, that's just excellent news for all cameraphone lovers. Top of the line smarphones haven't been doing too great in the camera department recently, so the N9 might be the first true all in one device.
The final exciting Nokia N9 rumor is its LTE connectivity. Even the source claims that this isn't confirmed yet so you need to take this with an extra pinch of salt.
There's less than four weeks remaining until the MWC kicks off so we'll find if the rest of it is true pretty soon. Here's hoping that the whole list gets confirmed!
Source (in Suomi)

Solved! : Trouble solving of Bluetooth Set up new device failed error. An error of Bluetooth device pairing of Ubuntu 10.04 Lucid Lynx

Written By Unknown on Saturday, 22 January 2011 | 07:33

Personal File Sharing Preferences menu


Nokia 2330-c mounted as a removable media


Set up completed


The key is in "introducing" our cellphone first to the system


Previous days, I was very annoyed by an error (perhaps that was a bug) of Ubuntu 10.04 Lucid Lynx. The error was I couldn't make bluetooth pairing between my computer and my cellphone. I often use bluetooth connection to transfer any files, from and to computer-cellphone (photos, Java applications). In the previous versions of Ubuntu (9.04 and the below), I never get any trouble to make bluetooth pairing. But in Ubuntu Lucid, I got my pairing process failed in the 'Set up new device' step. For so many times I'd tried, but I always got an error. Again and again I tried to make pairing and always been failed. I didn't know where the mistake was, but when I followed the wizard, I always got the error. At last, I got myself desperate because of its error and for long time I gave up and had been lost my interest to find the solution.


But recently, in the rest time, I made an experiment and unintentionally, I got the trouble solving. The key is we don't have to follow the wizard which the first step is 'Set up new device', but we could “introduce” our cellphone first, by sending it a file from our computer, and then we could follow the wizard. This is surely works to me. I can successfully receive and send files from my computer. Also, I can successfully 'Browse the device' so I can see my cellphone being visible just look like a removable media.


These are the steps to make a bluetooth pairing between Ubuntu 10.04 and cellphone:

  1. Plug the bluetooth dongle in; Or in some laptops, switch the internal bluetooth on :)

  2. Switch our cellphone bluetooth on.

  3. At the bluetooth icon in the notification area in the upper panel, click and select 'Send files to device'.

  4. Select any file (the smallest in filesize is picture) and wait for a moment until our cellphone is detected. Then, when our cellphone is visible, select our cellphone and transfer process will be ran.

  5. Go to the bluetooth icon once more, and for now, select the choice 'Set up new device'.

  6. When our cellphone is visible, select it. Leave the system to make automatic PIN selection.

  7. An confirmation about pairing process will be shown at our cellphone. We will be asked about the PIN code. Enter the PIN code, and press OK.

  8. The process is finished, and we can now use the connection to transfer any files, or to make a dial-up Internet connection.


I was very satisfied by this trouble solving. And even, now I am really satisfied by the bluetooth features of Ubuntu 10.04. I can make my computer always be visible to other bluetooth devices. I can make my computer always be ready to receives any file from any devices, without making a pairing process first.


Notes:

To make our computer always be ready to receives any file from any devices, we have to manage it by accessing Bluetooth Preferences menu. Go to System>Preferences>Bluetooth, or click at Bluetooth icon in the notification area, and select 'Receives Files' button. And then, will be shown a dialog menu titled 'Personal File Sharing Preferences'. Check all of the selections.


For the technical comparison, these are the equipments that I've used:

  • Ubuntu 10.04 Lucid Lynx with original kernel

  • CPU Intel Pentium IV 2.4 GHz

  • 512 MB Memory

  • K-One Bluetooth USB Dongle

  • Nokia 2330-c


Support : Creating Website | Johny Template | Mas Template
Copyright © 2011. Turorial Grapich Design and Blog Design - All Rights Reserved
Template Created by Creating Website Published by Mas Template
Proudly powered by Blogger